
Business
How to Add an Additional Place of Business in GST: A Complete 2025 Guide

Scaling your business is an exciting milestone. Whether you are opening a new branch, renting a warehouse for inventory, or setting up a virtual office for e-commerce sales, growth means progress. However, with expansion comes the responsibility of compliance. If you start operations from a new location without updating your GST registration, you risk significant penalties and operational bottlenecks.
The process to add an additional place of business in GST might seem technical, but it is a fundamental requirement for claiming Input Tax Credit (ITC) and generating valid e-way bills. This guide cuts through the jargon to provide you with a clear, step-by-step roadmap for 2025. We will cover the documents you need, the portal process, and how to avoid common rejection triggers.
What Is an Additional Place of Business (APOB) Under GST?
In GST terminology, your “Principal Place of Business” is the main address where your business books are kept and where the company’s head functions are performed.
An Additional Place of Business (APOB) refers to any other location within the same state where you:
- Conduct business (sales or services).
- Store goods (warehouses or godowns).
- Maintain books of accounts.
- Process orders (like Amazon FBA centers or Flipkart fulfillment hubs).
Essentially, if you are operating out of a location that isn’t your primary registered address, it falls under the umbrella of an additional place of business under GST.
Common Examples of APOB
- Warehouses/Godowns: Used strictly for storage.
- Branch Offices: Administrative or sales offices separate from the HQ.
- Virtual Offices: Used by e-commerce sellers to meet state-specific GST requirements without renting physical space.
- Factory Units: Secondary manufacturing plants within the same state.
Important Note: If your new place of business is in a different state, you cannot simply add it as an APOB to your current registration. You must obtain a fresh GST registration for that specific state.
Why You Must Declare Additional Places of Business
Skipping this step isn’t just a minor administrative oversight; it has real financial implications. Here is why the GST amendment for additional place of business is critical:
- Input Tax Credit (ITC): If you receive goods or services at a new location that isn’t registered, the ITC related to those purchases may be denied during an audit.
- E-Way Bills: You cannot generate an e-way bill for moving goods to or from a location that isn’t registered on the GST portal.
- Legitimacy: Operating from an undeclared location can lead to the confiscation of goods and imposition of penalties under Section 122 of the CGST Act.
- E-Commerce Compliance: Platforms like Amazon and Flipkart require you to register their fulfillment centers as your APOB to allow them to store and ship your inventory.
Documents Required for Additional Place of Business in GST
Before logging into the portal, ensure you have the correct digital paperwork. The documents required for additional place of business in GST depend on the nature of possession of the premises.
1. For Owned Premises
- Latest Property Tax Receipt.
- Municipal Khata copy.
- Copy of Electricity Bill.
- Ownership Deed/Legal ownership document.
2. For Rented or Leased Premises
- Valid Rent or Lease Agreement.
- Proof of ownership from the Landlord: A copy of the latest Property Tax Receipt or Electricity Bill in the landlord’s name.
3. For Shared Spaces or Consent-Based Premises (e.g., Family Owned)
- Consent Letter: A “No Objection Certificate” (NOC) from the owner stating they allow you to run the business from there.
- Proof of Address: Municipal Khata copy or Electricity Bill of the owner.
4. For Virtual Offices/Co-working Spaces
- Service Agreement with the Virtual Office provider.
- Utility bill (Electricity/Water) in the name of the provider.
- NOC from the owner: Explicitly mentioning the permission to use the address for GST registration.
Pro Tip: All files must be in PDF or JPEG format and under 1 MB in size.
Core vs. Non-Core Amendment: Which One Is It?
When you modify your GST registration, changes fall into two buckets: Core and Non-Core fields.
- GST Core Field Amendment: Includes changes to the legal name of the business, principal place of business, and additional places of business. These amendments usually require approval from a tax officer.
- GST Non-Core Field Amendment: Includes changes to email, phone numbers, or bank accounts. These are auto-approved.
Adding a new location is technically a Core Field Amendment. Once you submit the application, it goes to a tax official for verification. However, in many jurisdictions, if the documents are pristine, the approval can happen quite fast.
Step-by-Step Process to Add Another Business Location in GST
Follow this process to add another business location in GST to ensure your application is processed without queries.
Step 1: Login to the GST Portal
Visit www.gst.gov.in and enter your credentials. Complete the CAPTCHA to access your dashboard.
Step 2: Navigate to Amendment of Registration
Go to Services > Registration.
You will see two options for amendment. Select “Amendment of Registration Core Fields”.
Step 3: Select the Additional Places of Business Tab
The form will display several tabs (Business Details, Principal Place of Business, etc.). Click on the tab labeled “Additional Places of Business”.
Step 4: Add the New Location
- Look for the “Add New” button.
- Enter Details: Fill in the number of additional places you want to add.
- Address Fields: Enter the address details accurately.
-
- Pro Tip: Use the “Locate on Map” feature to pin the exact latitude and longitude, as this is increasingly mandatory for verification.
- Nature of Possession: Select whether the property is Owned, Rented, Leased, Consent, or Shared.
- Proof of Address: Upload the relevant documents (Rent agreement, Electricity bill, NOC, etc.) as discussed in the documents section.
- Nature of Business Activity: Check the boxes that apply (e.g., “Factory,” “Warehouse/Depot,” “Office/Sale Office”).
Step 5: Verification
Once the details are saved, navigate to the Verification tab.
- Select the verification checkbox.
- Choose the name of the Authorized Signatory from the dropdown.
- Enter the place (City).
- Digitally sign the application using DSC (Digital Signature Certificate) or EVC (Electronic Verification Code sent to mobile/email).
Step 6: Track ARN Status
Upon successful submission, a “Success” message will appear, and an Application Reference Number (ARN) will be sent to your registered email and mobile number. You can use this ARN to track the status of your application under Services > Registration > Track Application Status.
Timeline and Approval Process
After submitting form GST REG-14 (which is the backend form for amendments), the tax officer has roughly 15 working days to approve the application or raise a query.
- If Approved: You will receive a notification, and your GST Registration Certificate (REG-06) will be updated. You can download the fresh certificate from the portal.
- If Queries Raised: You will receive a notice in Form GST REG-03. You must reply within 7 working days with the necessary clarifications or documents.
Common Challenges and Solutions
Even experienced accountants face hurdles when trying to add an additional place of business on the GST portal. Here is how to troubleshoot them:
1. “Add New” Button Is Disabled
If you cannot click “Add New,” it means your original registration data declared “Zero” additional places.
Solution: Go back to the Principal Place of Business tab. Scroll to the bottom and find the toggle asking “Have Additional Place of Business?”. Switch it to YES. Save, and then proceed to the Additional Places tab.
2. Address Mismatch in Documents
The address on the rent agreement must match the address entered in the portal exactly.
Solution: Ensure spelling, pin codes, and door numbers are identical. If using a shared space, ensure the NOC explicitly states the full address including the specific office/desk number.
3. Verification Fails (DSC/EVC)
Sometimes the EVC DSC verification GST process times out.
Solution: Ensure your browser pop-up blocker is disabled and that your DSC software (EMSigner) is running with administrator privileges.
Consequences of Not Adding APOB
Ignoring the additional place of business GST rules can be costly.
- Penalty: Under Section 122 of the CGST Act, the penalty for not registering a place of business can be up to ₹25,000 or 100% of the tax evaded, whichever is higher.
- Seizure: Goods stored in an undeclared warehouse can be seized by tax authorities during inspection.
- ITC Loss: You cannot claim Input Tax Credit on the rent, utilities, or assets purchased for an unregistered branch.
Frequently Asked Questions (FAQs)
What is the time limit to add an additional place of business?
While the GST Act says amendments should be filed within 15 days of the event (e.g., signing a new lease), the portal allows you to file it anytime. However, it is best practice to do it before you start moving goods to the new location.
How do I delete an additional place of business in GST?
To delete an additional place of business in GST, follow the same steps: Login > Amendment of Core Fields > Additional Places of Business. Instead of “Add New,” locate the existing address you want to remove, click the “Delete” or “Edit” icon, provide a reason for deletion, and submit for verification.
Can I have multiple APOBs in the same state?
Yes, there is no strict limit on the number of APOBs you can add within a state under a single GSTIN.
Is physical verification mandatory for APOB?
It is not mandatory for every case, but tax officers have the discretion to conduct physical verification if they suspect the location is non-existent or “fake,” especially for virtual offices.
Conclusion
Updating your GST registration to include a new branch or warehouse is more than just a compliance tick-box; it protects your inventory and your right to tax credits. By following this guide on how to add an additional place of business in GST, you can ensure a smooth expansion in 2025.
Remember, the key lies in the documents. Ensure your proof of address for GST is valid, clear, and recent. Once you have the paperwork ready, the portal process is straightforward. Don’t wait for a notice from the tax department—update your registration as soon as you expand.
Ready to add your new office? Login to the GST portal now and get compliant!

Learn what an auto rickshaw business is, its types, startup steps, costs, profit potential, and benefits to start a successful transport business in 2026.
What Is an Auto Rickshaw Business?
The Auto Rickshaw business is a transportation business using three-wheeled motorized vehicles to transport passengers or small goods over short distances. They can either own their own vehicle or have several auto rickshaws in their name and rent them to drivers.
The business earns revenue through:
- Passenger fares
- Daily vehicle rentals
- Contract transportation
- School transportation
- Corporate employee pickups
- Tourist transportation
- Parcel delivery services
There are modern auto rickshaws in petrol, CNG, LPG, diesel, and electric, which gives the business owner the flexibility to choose according to the availability of the fuel and its operating cost.
Types of Auto Rickshaw Business Models
1. Owner-Driver Model
The entrepreneur purchases one auto rickshaw, and they drive it themselves. This model has the lowest overhead since there’s no need to pay a driver’s salary or commission, and all fare income goes directly to the owner.
2. Owner-Rental Model
An owner buys 1 or more auto rickshaws and hires them out to drivers on a daily or weekly basis (called “battaa” or “rental charge” in many parts of the country). It’s a popular passive income strategy, particularly if you’re not into driving yourself.
3. Fleet Business Model
Several auto-rickshaws (generally 10, 50, or even 100) are purchased by the investors and rented to others on an individual basis, or hired drivers are made to work on a salary/commission model. Such an approach involves a huge investment but gives a higher probability of profitable growth.
4. App-Based / Ride-Hailing Partnership Model
The drivers/owners register their Auto Rickshaws with the Ride-hailing Apps (Ola, Uber Auto, Rapido, InDrive, Local Apps) and get online booking, thereby avoiding wait time and making a larger number of trips.
5. E-Rickshaw (Electric Auto) Business
Due to higher costs of fuel and environmental laws, the electric auto rickshaws have gained popularity and constitute a growing part of the market. The electric rickshaws can be cheaper to run, cheaper to maintain, and even qualify for subsidies from the government for green transportation.
6. Cargo/Goods Auto Rickshaw Business
Rather than passengers, these three-wheelers are used to transport goods, which is very convenient for last-mile delivery, small businesses, farmers with crops for transport, or local logistics/e-commerce delivery partnerships.
7. Auto Rickshaw Dealership or Spare Parts Business
Entrepreneurs also operate in this industry who do not operate any vehicles but are into selling new and used auto rickshaws, finance, spare parts, tyres, or batteries to vehicle owners/operators.
How to Start an Auto Rickshaw Business: Step-by-Step
Step 1: Research the Local Market
Try to find out the demand for this in your target city/town; places with higher demand would have a high concentration of roads, railway stations, bus stands, marketplaces, schools, and mixed commercial and residential places.
Step 2: Choose Your Business Model
Depending upon your budget and risk appetite, you may decide to run your own fleet of vehicles, hire vehicles, or even operating e-rickshaws/cargo auto rickshaws.
Step 3: Calculate Startup Costs
These can be some of the expenses involved:
- Costs of purchasing the auto rickshaw (either new petrol/CNG/diesel rickshaw or electric rickshaw)
- Costs for registration and road tax
- Charges for commercial permit/license
- Insurance cost
- Cost of driver training or having your own driver’s license (commercial vehicle license, wherever necessary)
- Fuel/charging cost
Step 4: Obtain Necessary Licenses and Permits
This typically includes:
- Valid Commercial Driving License (in case you are driving)
- Certificate of Registration (RC)
- Route Permit or Transport Authority Permit (based on region)
- Insurance for the vehicle
- Emission or pollution certificates
- Registration with the local municipality/transport union, if any
Step 5: Purchase or Finance the Vehicle
Quite a lot of banks, non-banking financial companies (NBFCs), and auto manufacturers such as Bajaj, Piaggio, TVS, Mahindra, and various others offering electric rickshaw brands provide EMI financing facilities to purchase an auto rickshaw.
Step 6: Hire the Driver
If driving is not what you are after in an auto rickshaw, then you can opt for a competent driver, who can either be a leased one or paid a salary plus commission.
Step 7: Register with Ride-Hailing Apps (Optional but Recommended)
Riding into ride-sharing apps such as Uber Auto, Ola Auto, Rapido, and InDrive will definitely help to increase your trip numbers and even stop any idle time you have.
Step 8: Track Earnings and Maintenance
Keep a simple accounting book or an application for the recording of income, fuel charges, maintenance expenditure, and rental collection to know the exact profit earned.
Why Is the Auto Rickshaw Business Popular?
The requirement for auto rickshaws keeps increasing because they offer an easy mode of transport, where the use of buses and taxis can become difficult.
Major reasons include:
- Cheap mode of transport
- Easier movement through traffic
- Low operating expenses
- High demand throughout the day
- Flexible working hours
- Less capital required than for taxis
- High demand in cities and rural areas
Auto Rickshaw Business: Cost and Profit Overview
Despite varying from country to country, city to city, and type of vehicle to vehicle, there is a basic structure which almost everyone follows:
Typical Daily Revenue Sources:
- Transport fares (metered or fixed)
- Booking through an app
- Lease rate (if leased to the driver)
Typical Daily/Monthly Expenses:
- Costs for fuel or electricity/charging
- Costs for maintaining the vehicle (tires, brakes, engine services)
- Insurance premium (yearly, divided into monthly payments)
- EMI on loan if the vehicle is financed
- Renewal of permit/municipal charges
- Driver’s salary/commission (if any)
Profitability tends to increase greatly after repayment of the automobile loan, as the expenses incurred are mainly for fuel and maintenance purposes only. E-rickshaws prove to be more profitable than their petrol or CNG counterparts due to reduced running costs.
Advantages of the Auto Rickshaw Business
- Low investment cost relative to other forms of transportation business
- High everyday demand in urban and semi-urban environments
- Quick turnaround of money through daily/weekly income
- Scalable over time into becoming a full-fledged fleet
- Various sources of income generation (own driving, renting, fleet, cargo)
- The increasing trend of e-rickshaws provides low running costs and environmental friendliness
- Incentives offered by governments in many areas for the electric/CNG versions
Conclusion
Auto rickshaw business offers an affordable way to venture into the transportation business because there are many revenue sources. No matter whether one is operating one auto rickshaw or a fleet of auto rickshaws, success in such a venture demands that one chooses the right business model, reduces costs, provides services effectively, and adapts to innovations such as electric auto rickshaws.
Learn what business functions are, their types, importance, key roles, and how they help organizations improve efficiency, productivity, and long-term growth.
A business function is a particular task or area of an organization’s activities that is directed towards fulfilling its business purposes. All businesses, small or large, need to have various functions that allow them to function efficiently, respond to customers’ needs, make money, and thrive over time.
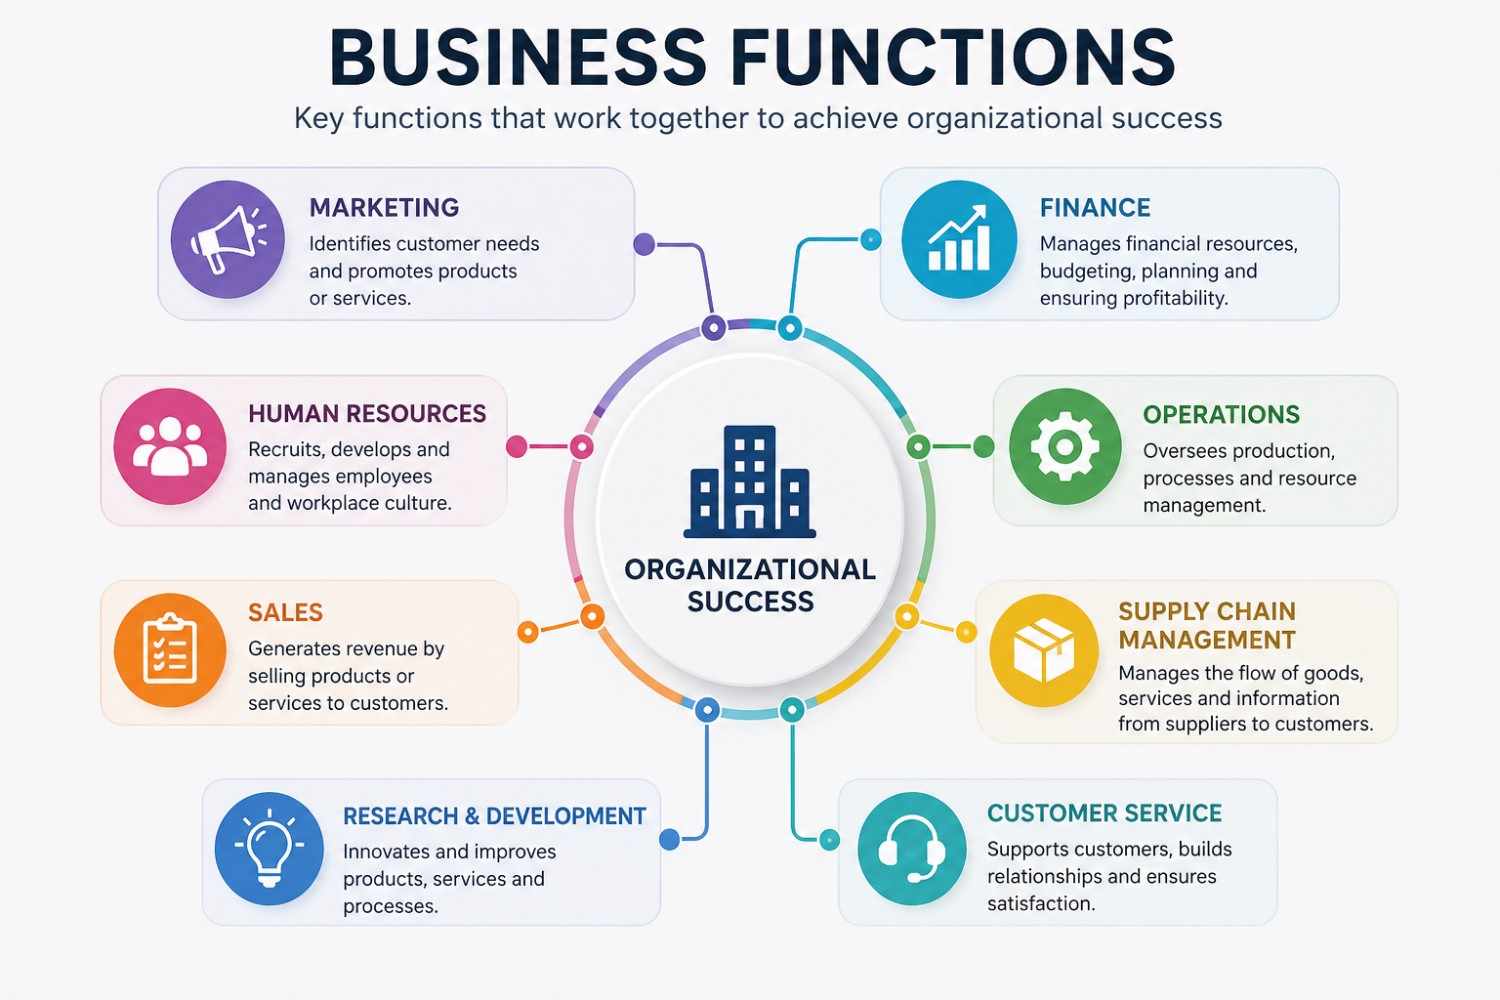
Business functions divide work into specialized areas to enable workers to concentrate on what they are good at, but function to achieve shared business goals. For instance, marketing brings in customers, finance handles finances, human resources hires personnel, and operations creates products or gives services.
The lack of clarity regarding organizational business roles can lead to ineffective communication, low productivity, and poor decision-making.
Why Are Business Functions Important?
The core of any successful business is its business functions. All of the functions play a role in the company’s overall performance and smooth running of daily operations.
Among the advantages are:
- Improves operational efficiency
- Increases employee productivity
- Helps achieve business goals
- Supports better decision-making
- Enhances customer satisfaction
- Reduces operational risks
- Promotes business growth
- Encourages teamwork between departments
If all aspects of every business function work effectively, the business becomes more competitive and profitable.
Core Business Functions Every Organization Needs
Each company and industry has a different structure, but most companies have the following business functions:
1. Operations Management
Operations are the very heart of any business. This function is responsible for the manufacturing of a product or the provision of a service, ensuring that matters are kept under control, that supplies are arranged, and that the processes are efficient.
2. Marketing
The Marketing function is all about customer needs, promotion, branding, and creating demand for products and services through advertising, digital marketing, and market research.
3. Sales
Marketing turns ideas into dollars. Marketing turns ideas into dollars, and sales turns marketing into dollars and cents. This function encompasses the process of lead generation, customer relationship management, negotiations, and closing deals.
4. Finance and Accounting
This function is responsible for the financial health of the company – budgeting, forecasting, bookkeeping, tax compliance, payroll, and financial reporting of financial information to stakeholders.
5. Human Resources (HR)
The HR department is tasked with recruitment, induction, training, performance appraisal, pay, and developing organizational culture – all of which are key components of the most important resource that an organization has – its people.
6. Research and Development (R&D)
R&D is all about innovation, new products, improved products, and technology to remain competitive.
7. Information Technology (IT)
In an increasingly digital environment, the IT function helps to maintain the daily operations of a company by handling its digital infrastructure, cybersecurity, software systems, and technical support.
8. Customer Service
It is used in addressing customer inquiries, concerns, and support, and it forms an important component of customer retention and customer satisfaction.
9. Legal and Compliance
In larger organizations, there might be a legal role overseeing contracts, IP, compliance, and risk management.
How Business Functions Work Together
There is no business without a business function. All the functions must be integrated and coordinated to ensure the success of a business organization. Consider this example:
- Marketing identifies a new customer trend.
- R&D produces a product that is appropriate to that trend.
- Operations produce the product in bulk.
- Finance keeps the project on budget!
- Sales are used to move the product to the market.
- Customer Service helps customers after their purchase.
- HR is responsible for making sure that the proper personnel are available at each step.
It’s an interconnected system that is frequently called cross-functional collaboration, and is a key factor for the success of an organization. Many modern firms have teams consisting of individuals from different departments who come together to form a team that works on projects requiring diverse skills.
Benefits of Effective Business Functions
Good business functions help in increasing efficiency and effectiveness in carrying out activities, ensuring that all departments are on the same page. They encourage effective communication, effective decision making, cost reduction, customer satisfaction, resource management, innovations, teamwork, and sustainable competitive advantage.
Business Functions in Small vs. Large Organizations
A small company or startup may have only one person doing many roles, such as a marketing and sales person doing the work of marketing, sales, and finance. As the company expands, the roles are delegated into separate functional units and teams.
In larger organisations, the business activities are often organised into separate business departments with their own departmental structure, key performance indicators (KPIs), and budgets. These functions are commonly integrated and managed in the organization through an ERP system.
How to Optimize Business Functions
To improve efficiency across business functions, organizations can:
- Responsibilities and performance metrics of each function are clearly defined
- Invest in automated processes and technologies to minimize manual labor.
- Utilize tools and frequent meetings to facilitate communication between departments.
- Conduct performance reviews to identify potential inefficiencies and delays.
- Functions must be strategically aligned with the business goals of the firm.
Conclusion
In any thriving enterprise, business functions are essential elements. These functions help to drive business performance and growth in the long-term, whether it be in operations, marketing, finance, or human resources. Good collaboration between departments means that businesses become more efficient, customers are happier, expenses are lower, and business strategies are met, while they are still competitive in today’s ever-changing business landscape.

Learn how to start a pickle business in 2026 with legal steps, investment, branding, marketing, packaging, and tips to build a profitable pickle brand.
What Is a Pickle Business?
Pickle business is an enterprise of making, packing, and marketing pickled food items like mango, lemon, mixed vegetables, chili, garlic, cucumber, olives, or any local specialty pickles. There are different routes for businesses to sell directly to consumers, to grocery stores, to supermarkets, to restaurants, to wholesalers, and through eCommerce marketplaces.
The business may be run from:
- Home kitchen (as allowed)
- Commercial kitchen
- Micro food processing facility.
- Large-scale processing factory
Why Start a Pickle Business?
The pickle segment is one of the most easily accessible industries in the food business. Here’s why:
- Low capital requirement as compared with other food manufacturing businesses.
- Long shelf life, which minimises the risk of spoilage and logistics issues.
- Rapid growth of homemade, artisanal, and healthy products. Demand for homemade, artisanal, and health products has been high.
- Easy to scale, can begin in a home kitchen and expand to a production kitchen
- Various sales channels such as local markets, eCommerce and retail relationships
The basics of developing a pickle business are the same whether you’re looking to sell traditional cucumber dill pickles, regional achaars, kimchi, or fruit-based pickles.
Types of Pickle Businesses
Knowing the various business models will help to determine where a pickle business might be suitable.
1. Traditional/Homemade Pickle Business
Production of small amounts, using local or family recipes, which is often sold locally or by word of mouth or social media.
2. Branded Commercial Pickle Business
An incorporated firm that manufactures pickles based on unique brand names through consistent recipes, packaging, and quality control processes, and then sells them through retail shops.
3. Private Label / Contract Manufacturing
A company that makes pickles for other companies or supermarkets using its own private brand, but with no interest in marketing or branding.
4. Export-Oriented Pickle Business
Companies that produce pickles specifically to export to other countries must comply with international food safety standards.
5. Specialty or Gourmet Pickle Business
Concentrate on the manufacture of specialized pickles, including fermented pickles, organic pickles, non-sugar pickles, or international/fusion pickles.
How to Start a Pickle Business in 2026
1. Research and Planning:
Do extensive research on the target market, competitors, and customers prior to launching the business. Find out what types of pickles are favored, calculate the cost of starting the business, state the objectives of the business, and formulate an attainable business plan.
2. Legal Requirements:
Register the business and get all necessary food licenses, permits, and tax registrations. Conduct yourself legally and in a manner that fosters customer confidence by adhering to all local food safety and labeling regulations, and hygiene and packaging guidelines.
3. Develop Unique Recipes:
Make tasty and uniform pickle recipes utilizing fresh ingredients with the correct amount of spices. Test different recipes, seek views from the consumers, and modify them into more effective recipes that will enable you to produce more appealing pickles than your competitor.
4. Source Quality Ingredients:
Acquire fresh fruits, vegetables, spices, oil, vinegar, and packaging materials from reliable sources. The quality of the ingredients will contribute to improved taste, shelf life of the products, product uniformity, and customer satisfaction.
5. Production Setup:
Give the production process good organization by ensuring that you have a clean environment and the right machinery and storage. For efficient and effective pickle production, cleanliness and efficiency are paramount.
6. Branding and Packaging:
Have an attractive and professional brand that has a logo, labeling, and packaging. Give your clients the required details about your pickles in terms of the ingredients, nutritional value, manufacturing date, and storage.
7. Marketing and Promotion:
Make use of social media marketing, event attendance, online platforms, food festivals, and customer references to promote your pickle venture. Make posts on social media, food ideas, and customer testimonials.
8. Distribution Channels:
Sell pickles using grocery stores, supermarkets, restaurants, farmers’ markets, wholesalers, and even the company website. An increased number of selling points means increased customers and revenue for the company.
9. Pricing Strategy:
Estimate production costs, packaging costs, labor, transportation, and marketing costs before pricing decisions. Fix a cost that is not only competitive and profitable but also attractive and affordable to your prospective clients.
10. Customer Feedback and Adaptation:
Make sure that customer feedback is collected regularly to know what they like. This will enable you to improve your product and ensure that your pickle business remains of high calibre, makes the customers satisfied, and grows continuously.
Profitability and Investment Considerations
The investment required to launch a pickle business is quite small compared to numerous other food industries, particularly at the home-based level. Typically, the profit margins for these products are very good because:
- Raw materials (vegetables, spices) can be inexpensive and, particularly, readily available in season.
- Pickles can be stored for a long time, which reduces the wastage.
- The finished product is more valuable than the raw product itself as a result of processing and value addition.
Profitability is determined by several things, such as the size of production, cost of packaging, level of competition, effectiveness of marketing, and distribution, among others.
Is a Pickle Business Profitable?
Yes. With the appropriate quality and hygiene standards, good branding, and marketing, a pickle business can earn handsome profits.
Average profit margin:
| Business Type | Estimated Profit Margin |
| Home-based | 25%–40% |
| Local retail | 30%–45% |
| Online brand | 40%–60% |
| Premium handcrafted brand | 50%–70% |
Profit depends on:
- Ingredient costs
- Packaging quality
- Brand value
- Production efficiency
- Marketing
- Distribution network
FAQs
Can I start a pickle business from home?
Yes, many brands are doing well today because they began as a home business. It is really important that every local food safety rule is followed, and that the food is packaged correctly; it can get messy.
Which pickle sells the most?
The mango pickle is kinda the most popular kind, followed by lemon pickle, mixed vegetables pickle, garlic pickle, and then green chili pickle. Depending on how folks locally taste things and what the regional population prefers, the demand might vary a bit.
How can I sell homemade pickles online?
For selling, the options would include local deliveries, social media platforms, online marketplace listings, and their own eCommerce site. For the web side, product images, plus customer feedback or customer reviews, would be what pushes the online sales.
How long do homemade pickles last?
The shelf life can change depending on the recipe, the ingredients used, the preservatives, and the storage conditions. If it is prepared and kept properly, then pickles can last a really long time, like very long.
Conclusion
The start-up of a pickle business in 2026 presents a great chance for entrepreneurs interested in a lucrative and in-demand food business. Through the utilization of high-quality raw materials, food safety, good packaging, marketing, and consumer satisfaction, a credible brand of pickles will be established, along with an increased consumer base to ensure sustainable business growth.
-

 BLOG2 years ago
Unlocking Opportunities: Top Small Business Ideas in Hyderabad
-

 Business2 years ago
Hеartfеlt Bеst Wishеs for Nеw Businеssеs: Encouragеmеnt & Succеss Tips
-

 BLOG2 years ago
Top Automotivе Businеss Idеas: Explorin’ Profitablе Vеnturеs in thе Auto Industry
-

 BLOG11 months ago
What is Traceloans.com Student Loans?
-

 BLOG2 years ago
Medicine Wholesale Business: An In-Depth Overview
-
BLOG2 years ago
Business Ideas in Tamilnadu: Profitable Options for Entrepreneurs
-

 BLOG2 years ago
Part Time Business Ideas in Tamil You Can Start from Home
-

 BLOG2 years ago
New Business Ideas in India: Exploring Prospects in a Vibrant Economy